How to Set Up the Web Clipper App and Save to Airtable Extension
There are a lot of bookmarking and web clipping extensions but I found Airtable’s to be the best. It offers great flexibility and allows me to control which information I save from a webpage.
Set Up Your Base for Web Clipper
First you need to create the fields you want to map to or fill out when saving a page. Here is an example of how my fields are set up.
| Field Name | Field Type | Field Purpose |
|---|---|---|
| Name | Single Line Text | A name I choose that summarized why I saved this page |
| Page Title | Single Line Text | Pulls in the name of the web page |
| Link | URL | Pulls in the URL of the web page |
| Notes | Long Text | Allows me to add extra notes about the web page |
| Highlighted | Long Text | Pulls in the highlighted text from the web page |
| Attachments | Attachment | Any images or screenshots from the web page |
| Topic | Single Select | A topic that I choose to help me organize the different content I save |
| Price | Currency | The price of items that I find on the web |
Add Web Clipper to Your Base
Now that your fields are set up, click on the ‘APPS’ button in the upper right hand corner of your base. Click the ‘Add an app’ button and search for ‘Web clipper’ and click on it when it shows up and then click the ‘Add app’ button.
You will now have to name this action as you could have multiple Web Clipper apps across your bases. You also have to specify which table you want the content to go to.

Mapping Fields
Airtable can automatically pull in certain information from a web page such as:
- Page title
- Page URL
- Selected Text
- Meta Tag
- Text Content by CSS Selector
- HTML Attribute by CSS Selector
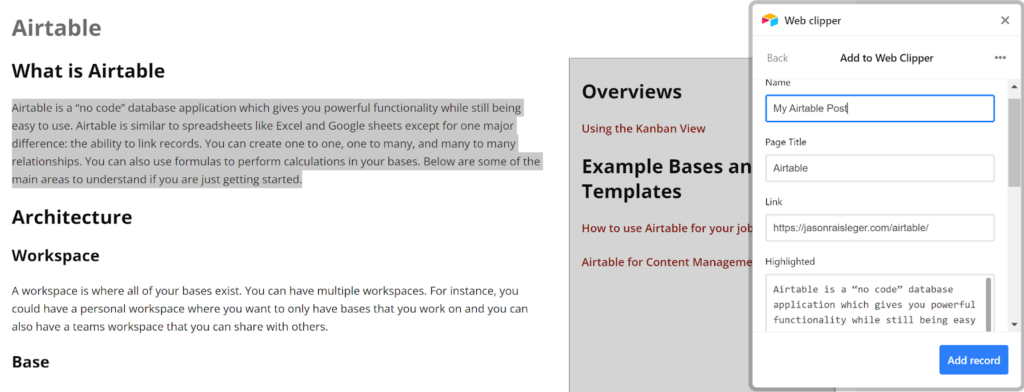
In my example, I want to map the Page Title field from the Page Title of the web page, the Link field from the Page URL, and the Highlighted field from the Selected Text. The rest of the fields we will not map as this will allow us to type in our own values when we click the extension.

Using the Save to Airtable Extension
As mentioned above, you can have Airtable grab a lot of information automatically from a web page.
You can also add attachments either via selected screenshot, a page screenshot (of the visible page), or of an image on the page – just hover over an image and once you see the plus sign next to the cursor, click on the image. Fill in any of the other fields with the values you choose and it will be added to your table to be referenced at any time.